构建 MCP 服务器:第一部分 — 资源入门
- AIGC
- 2025-05-29
- 419热度
- 0评论

什么是模型上下文协议?
模型上下文协议(MCP) 是Claude等大型语言模型 (LLM) 与外部数据和功能安全交互的标准化方式。您可以将其想象成一个平视显示器,或者 AI 的 USB 端口——它提供了一个通用接口,允许任何兼容 MCP 的 LLM 连接到您的数据和工具。
MCP 提供了一个集中式协议,简化了 AI 即插即用服务的开发。与其他可能需要为每个 AI 模型定制实现的集成方法不同,MCP 提供了一种适用于不同 LLM 的标准化方法。
如果没有像 MCP 这样的接口,LLM 就只能局限于其内置功能和训练数据。有了 MCP,LLM 可以实现以下功能:
- 读取文件和数据库
- 执行命令
- 访问 API
- 与本地工具交互
- 还有更多!
所有这一切都是在用户的监督和许可下进行的,因此既强大又安全。
在本教程中,我们将从 MCP 的基本内容开始:资源。
什么是 MCP 资源?
资源是 MCP 向 LLM 公开只读数据的方式。任何包含可读取内容的内容都可称为资源,例如:
- 计算机上的文件
- 数据库记录
- API 响应
- 应用程序数据
- 系统信息
每个资源都有:
- 唯一的 URI(例如
file:///example.txt或database://users/123) - 显示名称
- 可选元数据(描述、MIME 类型)
- 内容(文本或二进制数据)
为什么要使用资源?
资源可让您以受控、标准化的方式向 LLM 公开数据。以下是一些实际示例:
文档服务器
// 公开您公司的文档
“docs://api/reference”  -> API 文档
“docs://guides/getting-started”  ->用户指南
用户:“您能解释一下我们的 API 速率限制策略吗?”
AI 助手:“让我查看一下 API 文档……根据文档,每分钟的请求数限制为 100 个……”
日志分析服务器
“logs://system/today”  ->今天的系统日志
“logs://errors/recent”  ->最近的错误信息
用户:“今天我们的系统出现了什么错误?”
AI 助手:“查看今天的日志,我发现了三个严重错误……”
客户数据服务器
“customers://profiles/summary”  ->客户概览
“customers://feedback/recent”  ->最新反馈
用户:“最近顾客反馈的总体情绪如何?”
AI 助手:“分析最近的反馈,顾客的评价大多是积极的,但是……”
入门
首先,创建一个新目录并初始化一个 TypeScript 项目:
mkdir hello-mcp
cd hello-mcp
npm init -y
npm install @modelcontextprotocol/sdk
npm install -D typescript @types/node
在您最喜欢的 IDE 中打开目录。
让我们打开package.json并进行一些修改。删除显示 的行"main": index.js。在其位置添加一行新内容"type": "module"。最后,在下面"scripts"添加一个名为 的脚本"build",并将其值设置为"tsc"。
{
  "name": "hello-mcp",
  "version": "1.0.0",
  "type": "module",
  "scripts": {
    "build": "tsc",
    "test": "echo \"Error: no test specified\" && exit 1"
  },
  "keywords": [],
  "author": "",
  "license": "ISC",
  "description": "",
  "dependencies": {
    "@modelcontextprotocol/sdk": "^1.1.0"
  },
  "devDependencies": {
    "@types/node": "^22.10.5",
    "typescript": "^5.7.2"
  }
}
最后,创建一个名为的文件tsconfig.json并添加以下代码:
{
  “compilerOptions” : {
    “target” : “ES2022” ,
    “module” : “Node16” ,
    “moduleResolution” : “Node16” ,
    “outDir” : “。/build” ,
    “rootDir” : “。/src” ,
    “strict” : true,
    “esModuleInterop” : true,
    “skipLibCheck” : true,
    “forceConsistentCasingInFileNames” : true
   } ,
  “include” : [ “src/**/*” ]
}
现在环境已设置好并可以进行编码了。
创建您的第一个资源服务器
在src()中新建一个index文件src/index.ts,添加如下代码:
import { Server } from "@modelcontextprotocol/sdk/server/index.js";
import { StdioServerTransport } from "@modelcontextprotocol/sdk/server/stdio.js";
import {
  ListResourcesRequestSchema,
  ReadResourceRequestSchema,
} from "@modelcontextprotocol/sdk/types.js";

// Initialize server with resource capabilities
const server = new Server(
  {
    name: "hello-mcp",
    version: "1.0.0",
  },
  {
    capabilities: {
      resources: {}, // Enable resources
    },
  }
);
// List available resources when clients request them
server.setRequestHandler(ListResourcesRequestSchema, async () => {
  return {
    resources: [
      {
        uri: "hello://world",
        name: "Hello World Message",
        description: "A simple greeting message",
        mimeType: "text/plain",
      },
    ],
  };
});
// Return resource content when clients request it
server.setRequestHandler(ReadResourceRequestSchema, async (request) => {
  if (request.params.uri === "hello://world") {
    return {
      contents: [
        {
          uri: "hello://world",
          text: "Hello, World! This is my first MCP resource.",
        },
      ],
    };
  }
  throw new Error("Resource not found");
});
// Start server using stdio transport
const transport = new StdioServerTransport();
await server.connect(transport);
console.info('{"jsonrpc": "2.0", "method": "log", "params": { "message": "Server running..." }}');
理解代码
这个简单的服务器演示了 MCP 资源的关键概念:
服务器配置
- 我们创建一个具有名称和版本的服务器实例
- 我们启用资源能力
- 稍后将介绍提示和工具等其他功能
资源列表
- 处理程序
ListResourcesRequestSchema告诉客户端存在哪些资源 - 每个资源都有一个
uri、name和可选的description/mimeType - 客户端使用它来发现可用资源
资源阅读
- 处理
ReadResourceRequestSchema程序返回资源内容 - 它接受 URI 并返回匹配的内容
- 内容包括 URI 和实际数据
运输
- 我们使用 stdio 传输进行本地通信
- 这是桌面 MCP 实现的标准
测试您的 MCP 服务器
有几种方法可以测试您的 MCP 服务器。一种方法是使用 Claude Desktop,您也可以使用 MCP Inspector 工具在开发过程中测试所有功能。
设置Claude桌面
以下是在 Claude Desktop 中设置 MCP 服务器的步骤:
1:如果尚未安装 Claude for Desktop
2:打开Claude并访问设置:

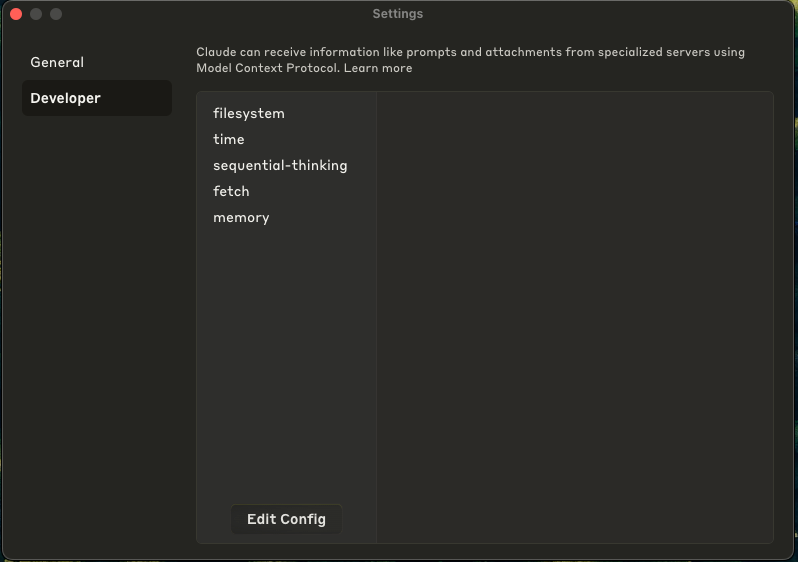
3:转到“开发人员”选项卡:

4:您将看到当前配置的 MCP 服务器列表
5:单击“编辑配置”以在系统的文件查看器中显示配置文件:

6:在默认编辑器中打开配置文件以添加 MCP 服务器配置:

7:将以下内容添加到您的配置中:
{
  "mcpServers": {
    "hello-mcp": {
      "command": "node",
      "args": ["/absolute/path/to/your/hello-mcp/build/index.js"]
    }
  }
}
8:构建并运行:
npx tsc
9:重启 Claude 桌面版
10:当您开始与Claude聊天时,选择MCP资源连接:

11:然后选择您的资源:

12:您的资源将作为附件出现:

使用 MCP 检查器
MCP Inspector是一个开发工具,可让您测试所有 MCP 功能:
检查器提供了一个用户界面,您可以在其中执行以下操作:
- 测试所有 MCP 功能(资源、提示和工具)
- 查看可用资源及其内容
- 调试服务器响应
- 验证您的实施是否按预期工作
测试新服务器的另一种简单方法是使用 MCP 检查器:
1:启动检查器:
npx @modelcontextprotocol/inspector node build/index.js
2:点击左侧“环境变量”列表下方的“连接”按钮

3:您首先应该会看到“资源”选项卡,在这里您可以查看问候语资源。点击“列出资源”按钮即可查看您创建的资源。

4:当您点击问候资源时,您将查看其内容

您会看到我们设计的相同响应:
- 资源列表显示了我们的资源名称:“Hello World Message”
- 读取资源返回“Hello, World! 这是我的第一个 MCP 资源。”
下一步是什么?
在第 2 部分中,我们将:
- 使用资源模板添加动态资源
- 通过将处理程序拆分成单独的文件来更好地组织我们的代码
- 了解如何有效地处理多种资源
- 学习高级资源模式和最佳实践
第 3 部分 和第 4部分将介绍提示和工具,以完成您的 MCP 服务器工具包。
资料来源及其他阅读材料:
- https://support.anthropic.com/en/articles/10065433-installing-claude-for-desktop
- https://modelcontextprotocol.io/quickstart/user
- https://modelcontextprotocol.io/quickstart/server
- https://modelcontextprotocol.io/tutorials/building-mcp-with-llms
- https://github.com/modelcontextprotocol
- https://claude.ai
- https://claude.ai/download


