Solarflarex2522低延迟网卡测试手册
- 系统运维
- 2024-05-24
- 916热度
- 0评论
测试背景和目的
光大证券是国内知名券商,应用业务需要支持高频的股票交易。通过低延迟的网络,在系统节点之间完成高频交易的数据交换。
测试环境
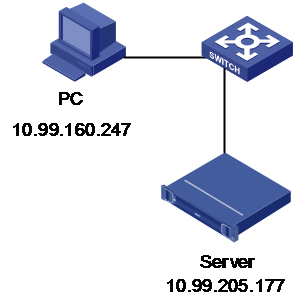
网络拓扑图

软硬件配置
测试规划
在两台服务器之间通过低延时网卡进行10Gb线缆直连,通过长ping得到0.07-0.08ms的延迟结果。
测试人员和测试时间
本次测试由xx专业测试人员xxx与POC团队、xx存储团队共同完成。
测试结果
测试步骤、遇到问题和解决办法
低延时网卡测试配置步骤
1、安装必要的软件包
yum install gcc make kernel-devel perl autoconf automake libtool pciutils net-tools rpm-build tuned kernel-devel.x86\_64 zip numactl net-tools –y
2、安装Solarflare驱动
从https://support.solarflare.com下载并安装openonload
cd onload-7.1.0.265/scripts
./onload\_install
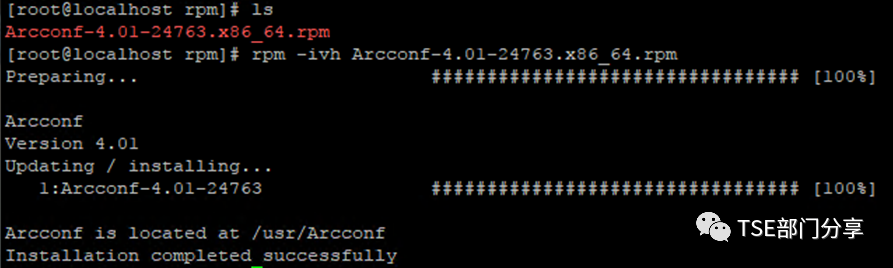
安装SF工具
unzip SF-107601-LS-69\_Solarflare\_Linux\_Utilities\_RPM\_64bit.zip
chmod +x sfutils-7.1.1.1000-1.x86\_64.rpm
rpm -ivh sfutils-7.1.1.1000-1.x86\_64.rpm

3、加载驱动设置低延时网卡参数
onload\_tool reload
修改网卡模式
sfboot firmware-variant=ultra-low-latency
4、服务器断电使网卡硬件设置生效,约5分钟
5、更改BIOS参数(以联想服务器SR650为例)
set OperatingModes.ChooseOperatingMode "Custom Mode"
set Memory.MemoryMode Independent
set Memory.Sparing Disable
set Memory.MemorySpeed "Max Performance"
set Memory.MemoryPowerManagement Disable
set Memory.SocketInterleave NUMA
set Memory.PatrolScrub Disable
set Memory.MemoryDataScrambling Disable
set Memory.PagePolicy Adaptive
set Memory.ColdBootFast Disable
set Processors.TurboMode Enable
set Processors.CPUPstateControl None
set Processors.CStates Disable
set Processors.C1EnhancedMode Disable
set Processors.HyperThreading Disable
set Processors.ExecuteDisableBit Enable
set Processors.TrustedExecutionTechnology Disable
set Processors.IntelVirtualizationTechnology Disable
set Processors.HardwarePrefetcher Enable
set Processors.AdjacentCachePrefetch Enable
set Processors.DCUStreamerPrefetcher Enable
set Processors.DCUIPPrefetcher Enable
set Processors.DCA Enable
set Processors.EnergyEfficientTurbo Disable
set Processors.UncoreFrequencyScaling Enable
set Processors.MONITORMWAIT Disable
set Processors.UPILinkDisable "Enable All Links"
set Processors.CODPreference Disable
set Processors.EarlySnoopPreference Enable
set Processors.SnoopPreference "Early Snoop"
set Processors.PerCoreP-state Disable
set Processors.CoresinCPUPackage All
set Processors.UPILinkFrequency "Max Performance"
set Processors. CPUFrequencyLimits "Full turbo uplift"
set Power.ActiveEnergyManager "Capping Disabled"
set Power.PowerPerformanceBias "Platform Controlled"
set Power.PlatformControlledType "Maximum Performance"
set Power.WorkloadConfiguration "I/O sensitive"
set DevicesandIOPorts.IntelVTforDirectedIOVTd Disable
set DevicesandIOPorts.BCM5719LowPowerMode Disable
set DevicesandIOPorts.COMPort1 Disable
set DevicesandIOPorts.COMPort2 Disable
set IMM.LanOverUsb Disable
6、更改Linux 核心参数
Vi /etc/sysctl.conf
追加
vm.swappiness=0
vm.zone\_reclaim\_mode=0
vm.min\_free\_kbytes=100000
vm.nr\_hugepages=2048
net.ipv4.ip\_forward = 0
net.ipv4.conf.default.rp\_filter = 1
net.ipv4.conf.default.accept\_source\_route = 0
kernel.sysrq = 0
kernel.core\_uses\_pid = 1
net.ipv4.tcp\_syncookies = 1
kernel.msgmnb = 65536
kernel.msgmax = 65536
kernel.shmmax = 68719476736
kernel.shmall = 4294967296
net.ipv4.tcp\_timestamps = 0
net.ipv4.tcp\_sack = 0
net.core.netdev\_max\_backlog = 250000
net.core.rmem\_default = 262144
net.core.wmem\_default = 262144
net.core.rmem\_max = 16777216
net.core.wmem\_max = 16777216
net.ipv4.tcp\_low\_latency = 1
net.ipv4.tcp\_adv\_win\_scale = 1
net.ipv4.tcp\_moderate\_rcvbuf = 1
net.core.busy\_poll = 50
net.core.busy\_read = 50
net.ipv6.conf.all.disable\_ipv6 = 1
net.ipv6.conf.default.disable\_ipv6 = 1
net.ipv4.ip\_forward = 0
net.ipv4.conf.all.send\_redirects = 0
net.ipv4.conf.default.send\_redirects = 0
net.core.netdev\_budget = 600
kernel.nmi\_watchdog = 0
7、关闭不必要的服务
systemctl {stop,disable,mask} abrt-ccpp abrtd abrt-oops alsa-state anacron atd autofs avahi-daemon bluetooth certmonger cups cpupwoer firewalld haldaemon hidd irqbalance iptables ip6tables iptdump iprinit iprupdate mdmonitor messagebus nfs-lock postfix restorecond rhnsd rhsmcertd rpcbind
8、修改Grub文件
vi /etc/default/grub
在GRUB\_CMDLINE\_LINUX后追加参数:
intel\_idle.max\_cstate=0 processor.max\_cstate=0 idle=poll pcie\_aspm=performance mce=ignore\_ce ipmi\_si.force\_kipmi=0 nmi\_watchdog=0 hpet=disabled noht nohz=on nohalt nosoftlockup transparent\_hugepage=never
grub2-mkconfig -o /boot/grub2/grub.cfg
9、关闭selinux
sed -i '/SELINUX/s/enforcing/disabled/' /etc/selinux/config
10、配置OS系统模式
tuned-adm active
tuned-adm profile latency-performance
11、更改网络端口参数
ethtool -C ens3f0 adaptive-rx off
ethtool -C ens3f0 rx-usecs 0
12 reboot
测试遇到问题及解决方案
1、网卡延迟不能降低至10ms以下。
解决方法:关闭多余的服务。可能导致系统某些常用功能关闭。反复检查上述优化的方法是否生效。
2、有个别端口无法启动 low latency模式。
Sfboot –c 然后重启
测试总结
目前大多数客户均使用ICMP的背靠背ping延迟作为测试标准,但是该测试指标并不能代表真实性能。在成功把ping延迟降低以后,使用Netperf和sfnettest测试结果并未有明显变化。
经测试观察,使用万兆直连线缆进行背靠背ping测试的平均延迟在0.008 ms左右
NetPerf工具测试
由低到高设置发送/接收数据包的型号大小,通过TCP方式对另一台服务器进行发送,记录测试结果并计算平均延时。
使用使用Solarflare标准sfnettest工具进行测试
SR590服务器1(server端) 运行命令
onload --profile=latency ./sfnt-pingpong
SR650服务器2(client端) 运行命令
onload --profile=latency ./sfnt-pingpong --maxms=10000 --affinity 1,1 tcp 192.168.90.111
测试结果如下,网络延迟平均1.1微秒
size mean min median max %ile stddev iter
1 1091 1061 1088 35605 1138 49 1000000
2 1090 1061 1087 20990 1136 36 1000000
4 1091 1061 1088 27175 1137 38 1000000
8 1102 1073 1099 12223 1164 35 1000000
16 1126 1092 1120 21913 1243 39 1000000
32 1140 1106 1135 11475 1262 32 1000000
64 1170 1134 1164 23658 1293 38 1000000
128 1236 1200 1231 12504 1337 35 1000000
256 1329 1281 1325 6062 1429 45 1000000
512 1538 1483 1534 6115 1607 42 1000000
1024 2099 2020 2092 25226 2245 69 1000000
2048 3110 2931 3008 6902 3531 192 1000000
4096 5095 4738 4854 15824 5642 325 979000
8192 8917 8411 8959 34848 9444 304 560000
16384 16020 15502 16043 24403 16650 303 312000
32768 29936 29375 29954 34661 30616 280 167000
65536 57581 57024 57593 66387 58336 281 87000