HTTP boot与传统PXE的主要差异
HTTP不再需要使用UDP协议的tftp服务(连接不可靠、不支持大文件)了,只需要dhcp 和http 两个服务即可,支持较稳定的大文件传输。
实验环境
ThinkSystem服务器SR650V2 SR660V2 通过HTTP boot安装CentOS8.1
基本步骤
HTTP boot三剑客
剑眼 制作http boot 的NBP文件
剑魂 HTTP boot服务器的搭建
剑灵 服务器端开启http boot
制作http boot 的NBP文件
使用ipxe编译制作支持http boot的NBP文件(根据了解,目前CentOS自带的NBP不支持http boot,网络上的其他tips,基本上都是使用SLES的NBP文件,对于使用者来说,很难理解其内部的文件嵌套调用情况,所以本文描述的实验是基于ipxe自己编译NBP文件,这样的话我们能很清楚地了解文件调用情况,便于根据实际需求制定方案)
获取ipxe源
从ipxe.org官网获取ipxe的源码
git clone https://github.com/ipxe/ipxe.git
创建ipxe自定义脚本
切换目录到ipxe/src/, 然后创建自定义ipxe脚本myipxe.script
\#!ipxe
:retry\_dhcp
dhcp || goto retry\_dhcp
chain http://${next-server}/ipxe.txt
内容说明:
上述例子中文件名可以自己定义,第一行是ipxe脚本的语法,中间的两行是实现“当dhcp没获取到ip时,不断重试dhcp,直到获取到ip”,最后一行是指定调用的文件,其中变量${next-server}是由dhcp服务传递过来的(这个调用的机制与CentOS7.X官方ISO中的NBP文件BOOTX64.EFI默认调用grub.cfg文件的原理类似)
ipxe是一个强大的工具,如果需要ipxe支持https,nfs等其他文件传输方式,可以在编译前修改ipxe/src/config/general.h文件,将对应协议前的#undef替换为#define
编译基于ipxe的NBP文件
编译ipxe的NBP文件,因为http boot只支持UEFI启动模式,所以我们需要编译uefi版本的NBP文件,编译完成后,我们将生成的ipxe.efi文件拷贝到网络部署服务器上待用。
make bin-x86\_64-efi/ipxe.efi EMBED=myipxe.script
HTTP boot服务器的搭建
dhcp配置文件准备
以下是本实验中用到的dhcp配置文件,以下例子中dhcp会根据客户端发送请求的标志区分其发送的是pxe请求还是http boot请求,指定不同的NBP文件。
cat /etc/dhcp/dhcpd.conf
option space PXE;
option PXE.mtftp-ip code 1 = ip-address;
option PXE.mtftp-cport code 2 = unsigned integer 16;
option PXE.mtftp-sport code 3 = unsigned integer 16;
option PXE.mtftp-tmout code 4 = unsigned integer 8;
option PXE.mtftp-delay code 5 = unsigned integer 8;
option arch code 93 = unsigned integer 16;
allow booting;
allow bootp;
subnet 172.20.0.0 netmask 255.255.0.0 {
range 172.20.0.101 172.20.200.240;
default-lease-time 36000;
max-lease-time 36000;
next-server 172.20.0.1;
option routers 172.20.0.11;
option domain-name-servers 208.67.222.222,8.8.8.8;
class "pxeclients"{
match if substring (option vendor-class-identifier, 0, 9) = "PXEClient";
filename "bootx64.efi";
}
class "httpclients" {
match if substring (option vendor-class-identifier, 0, 10) = "HTTPClient";
option vendor-class-identifier "HTTPClient";
filename "http://172.20.0.1/ipxe.efi";
}
}
内容说明
根据上面的dhcp服务的配置文件,http boot的机器会尝试获取http://172.20.0.1/ipxe.efi这个NBP文件,所以我们需要将前面编译好的ipxe.efi文件放到http服务相应的目录(本测试用的是默认的/var/www/html/目录)
在前面创建ipxe自定义脚本时,我们指定了NBP文件启动后会调用的脚本http://${next-server}/ipxe.txt,所以我们需要编辑这个文件,并放到http服务相应的目录/var/www/html/
ipxe 内容
cat ipxe.txt
\#!ipxe
:start
menu HTTP Boot CentOS8.1
item --key 1 http\_boot\_centos\_installer
:http\_boot\_centos\_installer
echo CentOS8.1 Installer
set server\_ip 172.20.0.1
kernel http://${server\_ip}/centos81/images/pxeboot/vmlinuz initrd=initrd.img inst.ks=http://${server\_ip}/dxl-ks.cfg rd.net.timeout.carrier=30 inst.ksdevice=link inst.ip=dhcp
initrd http://${server\_ip}/centos81/images/pxeboot/initrd.img
boot || goto failed
内容说明
上面的定义实际上类似于pxe部署时对grub.cfg文件的定义,按上面定义的路径在httpd服务的根/var/www/html/下创建好centos81目录并挂载CentOS8.1的安装镜像, 将kickstart文件(本实验中指定的kickstart文件是dxl-ks.cfg)复制到/var/www/html/目录。
总的来说,在ipxe中指定的kernel、initrd、ks文件要能被访问。
服务器端开启http boot
服务器端开启http boot,本实验中测试了联想服务器SR650V2和SR660V2,对应的设置项分别如下:
Thinkserver SR660V2的设置项
Bios.IPv4HTTPSupport=Enable
Thinksystem SR650V2的设置项
NetworkStackSettings.IPv4HTTPSupport=Enabled
HTTP Boot 验证
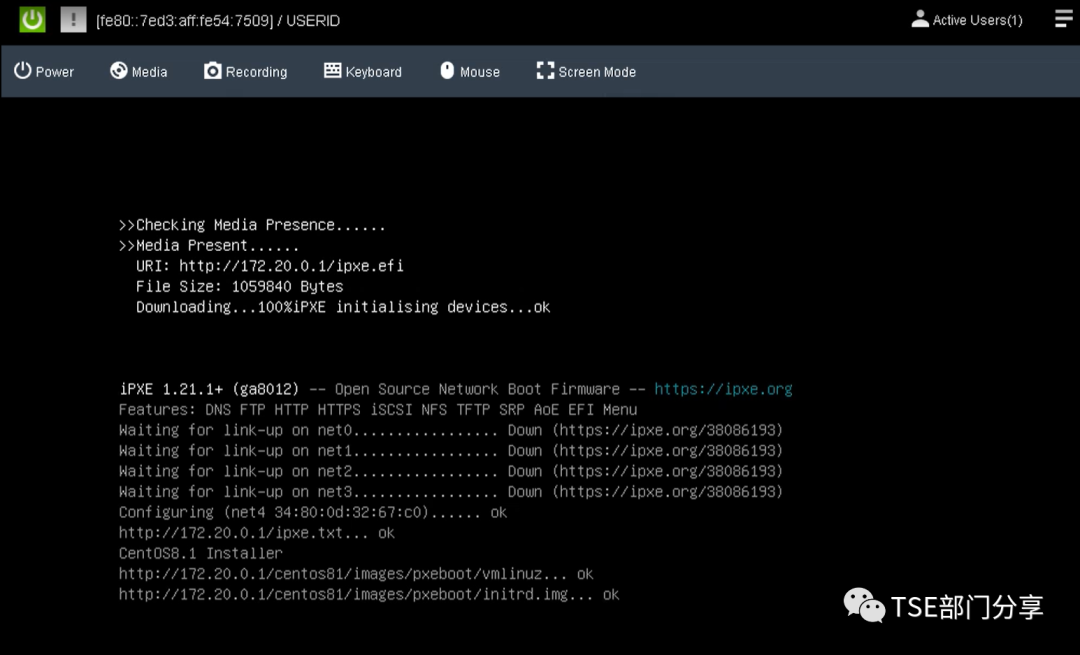
将服务器开机,根据提示按F12,然后选择“HTTP IP4”(注意不是PXE IP4)的启动项即可http boot
如果需要将http boot加入到启动项中,请参考如下链接的第19页
https://lenovopress.lenovo.com/lp0736-using-http-boot-to-install-an-operating-system
ipxe引导成功

本文转载自联想TSE文档
